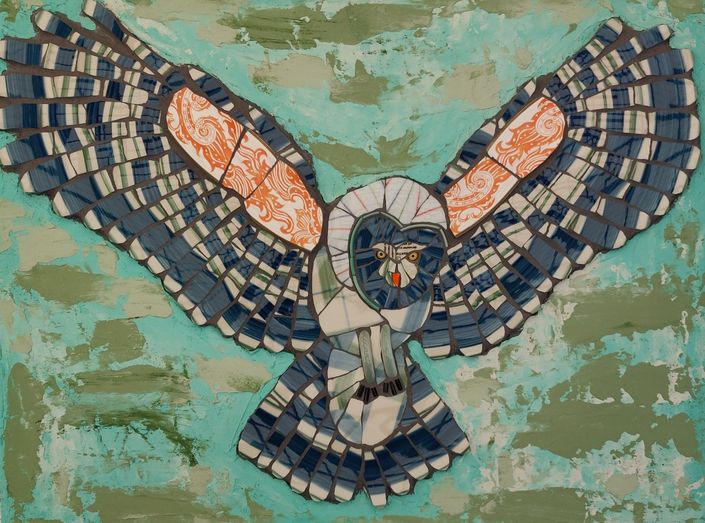
Have you been saving your Grandmother’s china? Have you been hoping to use it one day in some form of Picassiette mosaic? Do you scour thrift shops and yard sales in search of that perfect plate, cup, or bowl? Does your imagination run wild when you find unique and special pieces that must go into your artwork? Well this is the course for you! Learn to use all of these materials from the instructor who brought us “Picassiette Portraiture.” Gila Rayberg now shares even more tips, tricks, and techniques with her new course called “Learning to Fly with Picassiette.” Gila is one of the best instructors and artists working with these types of materials, and we could not be more thrilled to have her here at Mosaic Arts Online.
In this course, Gila shares how working with a subject such as an owl can take away some of the pressure of creating a portrait of a loved one. Learning these skills can be the gateway to creating more with Picassiette.
Gila will share how to choose the best image based on certain features and the position of the owl. Then you will be guided step-by-step as Gila demonstrates how to choose and prepare the Wedi board substrate with thinset and mesh. She will trace the image, and then discuss the pros and cons of picking certain types of china or dishware.
Once you have chosen the materials, Gila explains which tools are the best for breaking down, cutting, and shaping.
Gila completes an entire mosaic in real time while she works on a Wedi board substrate. You will see her make choices, and she will explain how to use thinset as your adhesive for manipulating the tesserae. This technique will help you achieve the best depth and dimension within each placement.
Once you have completed the mosaic, Gila demonstrates her grouting process. You will see how she does this without the entire board covered in tesserae, which is a great way to learn this technique. Finally, she will show her unique method for creating a background effect. Using special pigment tints and thinset, Gila “paints” the board with a palette knife which gives the background a sky-like effect.
This course comes with a PDF for download with all the tools, materials, and resources.

Your Instructor

Gila Rayberg arrived at the visual arts after a successful career as a freelance musician and educator. Allowing her strong sense of intuition and love of experimentation to guide her, Gila has developed a unique voice in the realm of mosaic portraiture.
After earning her masters degree in music from Arizona State University (1989), Gila moved to San Francisco and quickly became involved with a community of improvisational musicians, composers and artists.
Pursuing her love of travel, Gila found herself performing & teaching instrumental music at a newly established University in Borneo, East Malaysia. From there, she traveled extensively throughout South East Asia, Hong Kong, China, India, Israel & Egypt, collecting art, textiles, and musical instruments, representative of local cultures. With each excursion Gila became increasingly fascinated by the indigenous art which surrounded her.
On her return to the United States, Gila landed in New Orleans, spending her first year practicing jazz standards on the street for tips. She then joined the horn section of Deacon John & the Ivories which kept her gigging steadily until hurricane Katrina hit in 2005. At that point, Gila turned her focus to creating mosaic art full time.
In recent years, Gila's work has been exhibited around the US, winning numerous awards for her expressive and whimsical portraits. Her work resides in private collections internationally & has been published in a number of books.
Course Curriculum
-
StartIntro and Personal Interview with Tami. (5:39)
-
StartPDF for Download. Tools, Materials, and Resources.
-
StartReference Photo. (0:42)
-
StartTransfer the Design. (3:05)
-
StartDarken the Lines. (3:50)
-
StartWrap the Edges with Mesh. (2:14)
-
StartThin set the Edges. (4:30)
-
StartIntro to Tools. (2:07)
-
StartIntro to the Plates. (1:56)
-
StartHow to Cut the Material. (7:58)
-
StartShaping the Material. (2:08)
-
StartDry Laying the First Pieces. (2:58)
-
StartStart to Adhere the Feathers. (9:24)
-
StartCreating the Wing. (7:11)
-
StartHow to Use a Bowl with Curvature. (4:07)
-
StartCleaning the Tesserae and Continuing to Create. (9:52)
-
StartCreate the Eyes. (9:34)
-
StartHow to Create the Beak. (9:19)
-
StartWorking Around the Face. (9:29)
-
StartHow to Use the Rim of a Cup. (8:06)
-
StartClean the Tesserae and Finish the Head. (10:11)
-
StartCreate the Legs and Talons. (7:54)
-
StartCreate the Body. (10:58)
-
StartFilling in the Body. (8:55)
-
StartAdding a Darker Color for Contrast. (0:35)
-
StartWatch in Real Time as Gila Cuts and Shapes. (1:08)
-
StartFilling in Top of the Wing. (7:13)
-
StartFilling in the Tail. (9:42)
-
StartFinishing the Tail. (7:35)
-
StartTop of the Wing. (6:45)
-
StartFinishing off the Back of Mesh Thin Set. (3:30)
-
StartGrout Part 1. (4:14)
-
StartGrout Part 2. (11:06)
-
StartHow to Tint and Create a Painted Thin Set Background. (9:51)
-
StartFinishing the Background and Wrap Up. (5:47)