
Picassiette Dog Portrait with Solange and Alex Piffer
Learn the Art of Creating Dimensional Dog Portraits in Picassiette~Woof! Woof!
Watch Promo Enroll in Course
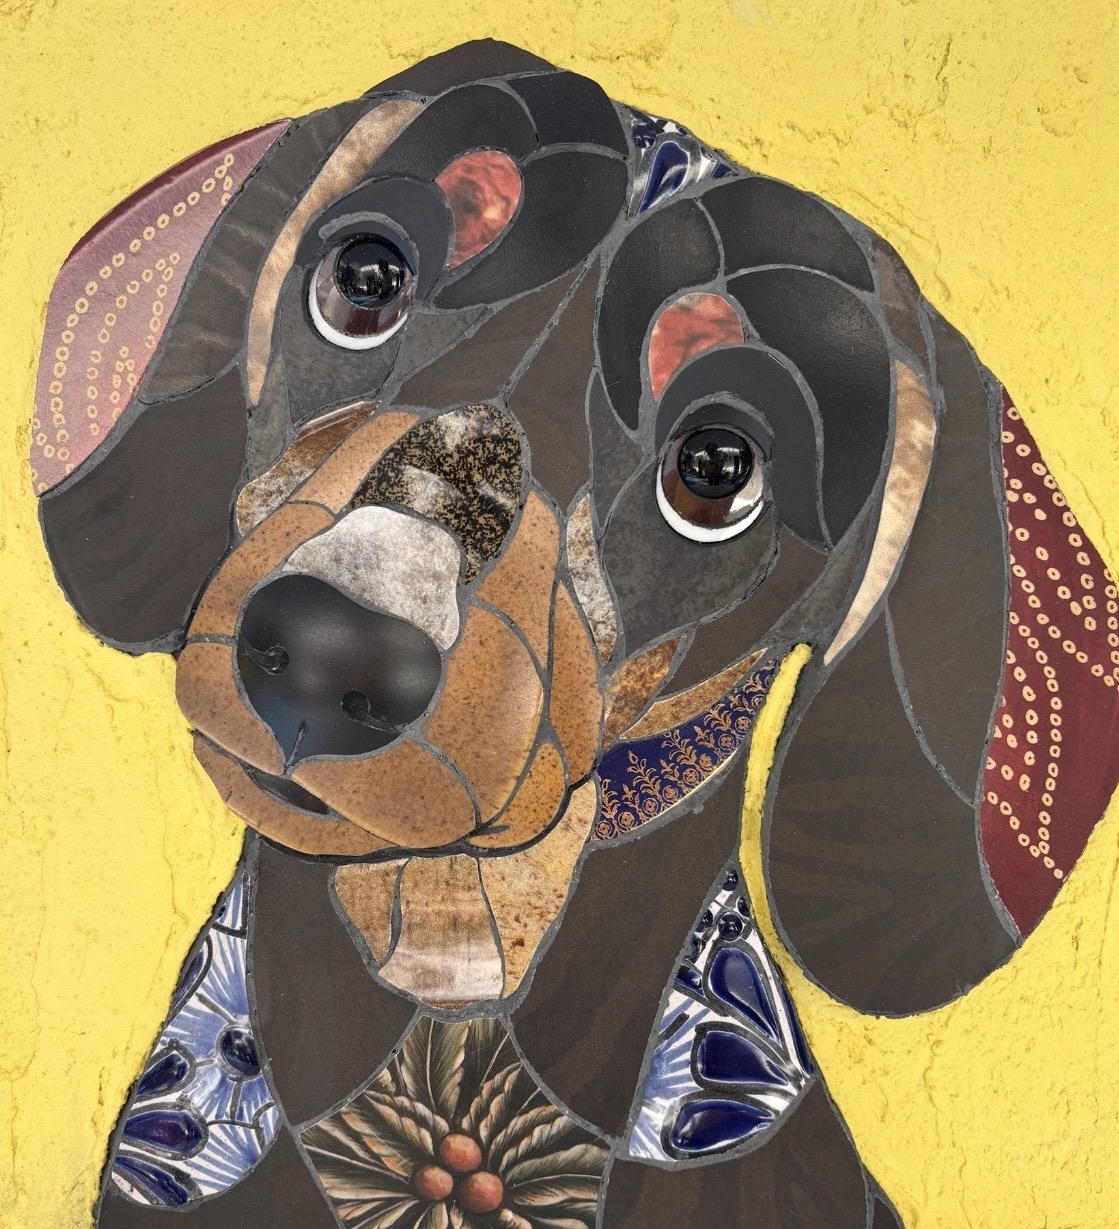
Please take a moment to read the entire course description. There is important information throughout, including details you’ll want to know at the very end.
Have you ever looked at a favorite photograph of your dog and wondered how you could capture not only what they look like, but their personality and expression in picassiette mosaic?
In Picassiette Dog Portrait, Solange and Alex Piffer take you step by step through their distinctive process for transforming broken plates, mugs, bowls, and pieces of china into a dimensional mosaic dog portrait filled with character.
Solange and Alex are among some of the most sought-after mosaic artists working in the Picassiette style, and when you see the incredible detail, dimension, and personality they create using broken china, it is easy to understand why. Their work has a style that is distinctly their own, and in this course, you get the opportunity to watch their process up close and learn the techniques behind it.
Solange and Alex are from Brazil, and their native language is Portuguese.
We wanted their teaching and techniques to be accessible to our English-speaking mosaic community, so we have translated and dubbed the entire course into English.
You can watch their hands at work while listening to the instruction in English, while still enjoying Alex and Solange's accent and personality, making it easy to follow along as they demonstrate each step of their Picassiette process. The course also includes subtitles in Spanish, Hebrew, and Portuguese, making it accessible to even more students around the world.
This course goes far beyond simply copying a photograph. You will learn how Solange and Alex look at the shape of a dog’s face, the direction of the fur, the contours of the body, the eyes, nose, ears, and expression, and then make thoughtful choices about which pieces of china will best bring those features to life.
One of the most exciting parts of their process is learning to see a plate differently. A curve that once formed the edge of a dinner plate can become the contour of a cheek. A pattern can suggest the direction of fur. A perfectly chosen piece of china can become an eye, nose, ear, or defining feature of your dog.
Alex shares his techniques for cutting, grinding, refining, fitting, and adhering the china, while Solange shares her approach to color, pattern, composition, and creating the background. Together, they show you how the smallest adjustments can completely change the expression and personality of your portrait.
A Note About Tools
To really achieve the dimension, close-fitting pieces, and refined details that are an important part of Solange and Alex’s Picassiette technique, they recommend that you have a glass grinder and a Dremel rotary tool.
These tools allow you to shape and refine the china in ways that nippers alone cannot, especially when creating the eyes, nose, facial contours, and those small pieces that need to nestle closely together.
Solange and Alex share the tools they recommend inside the course, along with a downloadable Suggested Tools, Materials, and Resources PDF, so you will know exactly what you need to get started.
In this course, you will learn how to:
- Choose the right photograph for creating a successful mosaic dog portrait.
- Select the appropriate substrate and transfer your image and design.
- Create a palette from plates, mugs, bowls, and china, considering color, pattern, shape, and natural curves.
- Map out the dog's facial features to establish proportion, structure, and balance before you begin cutting.
- Understand dimension and relief and how varying the height and placement of china creates a sculptural quality.
- Create templates for important features and use them to select and cut the right pieces of china.
- Build the nose, including shaping it with a grinder and using a Dremel to create the nostrils and finer details.
- Construct expressive eyes, from choosing and shaping the pupil and iris to creating the white of the eye and fitting the surrounding pieces.
- Create the ears and facial contours using the natural curves, patterns, and shapes found in plates.
- Choose china intentionally for different areas of the face, rather than simply filling spaces with pieces that fit.
- Use pattern direction to help describe fur, form, movement, and facial structure.
- Refine and grind individual tesserae so pieces nestle together and create a more precise fit.
- How to create a muscular dog versus a fluffy dog.
- Prepare and tint thinset and learn how Solange and Alex use mortar as part of the finished visual design.
- Apply the correct amount of thinset to each piece to help control height, alignment, dimensions, and placement.
- Adhere pieces in an intentional order while protecting surrounding pieces from being bumped or shifted.
- Work progressively into smaller, more detailed areas of the face, including the mouth and surrounding features.
- Create a background that complements your portrait without competing with your dog.
- Use a piping bag to apply tinted mortar in very narrow spaces and difficult-to-reach areas.
- There is a Bonus alternative technique for creating the eye so you have another option to use in your own portraits.
More Than a Dog Portrait
While Solange and Alex guide you through creating a dog portrait, the skills in this course can take you much further.
You are learning how to look at ordinary china and recognize shape, curve, pattern, color, dimension, and possibility. You are learning how to build form rather than simply fill an outlined space. And you are learning how very small choices in the placement and shaping of a tessera can create expression.
Your finished mosaic can be a portrait of your own dog, a beloved dog from your past, or the one created in this course. Most importantly, you will come away understanding Solange and Alex's Picassiette techniques so you can apply them to future mosaic work and develop portraits that have dimension, personality, and a style all your own.
You may notice that this course has been dubbed into English from Solange and Alex’s native Portuguese. Occasionally, when Alex says “Picassiette,” the dubbing system interprets it as “P7,” which may also appear in the subtitles. We are working to correct this, but in the meantime, please know that whenever you hear or see “P7,” Alex is referring to Picassiette.
Your Instructor
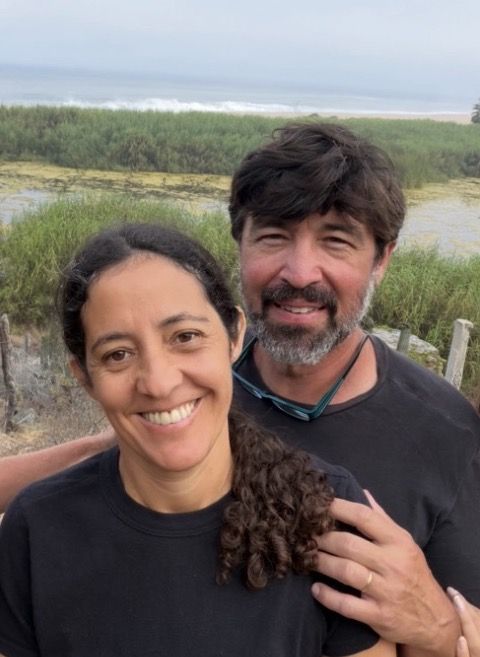
Solange and Alex Piffer are Brazilian mosaic artists known for their distinctive approach to Picassiette, transforming broken plates, bowls, mugs, and other pieces of china into expressive, highly dimensional mosaic art.
Working together, Solange and Alex have developed a recognizable style that combines their individual strengths and creative perspectives. Their work goes far beyond simply arranging broken china. They carefully consider the curves, patterns, colors, and shapes already present in each piece and use them intentionally to create form, movement, expression, and dimension.
Their mosaic portraits are especially captivating. A curved edge of a plate can become the contour of a face, a small pattern can suggest fur or movement, and carefully shaped pieces of china can bring remarkable expression to an eye, nose, or other defining feature. Their ability to see the possibilities within everyday objects is an important part of what makes their work so unique.
Solange brings a strong sense of color, pattern, composition, and design to their work, while Alex’s meticulous cutting, grinding, shaping, and construction techniques allow the pieces to fit together with incredible precision. Together, their skills result in mosaics filled with personality, texture, and sculptural dimension.
Through their teaching, Solange and Alex generously share not only how they create their Picassiette mosaics, but also why they choose particular pieces, shapes, patterns, and techniques. Their goal is to give students the skills and understanding to take these techniques and use them to develop mosaic work that reflects their own creative voice.
Course Curriculum
-
StartAlex and Solange Piffer's Intro (2:19)
-
StartPDF for download: Suggested Tools, Materials, and Resources
-
StartDownload the Dog Image Used in This Course
-
StartHow to Choose the Best Photo For Your Dog Mosaic (0:46)
-
StartChoosing the Best Substrate and Placing The Image On It (1:51)
-
StartSelecting Plates, Mugs, and Bowls for Your Mosaic Palette (5:25)
-
StartNecessary Tools for This Project (4:02)
-
StartMapping the Dog’s Facial Features for Design and Balance (22:43)
-
StartMapping Out the Design: Structure and Balance for Large Pieces (5:34)
-
StartUnderstanding Dimension and Relief Using a Coin (3:25)
-
StartTransfer the Design to the Substrate (7:36)
-
StartTracing Over the Design with a Silver Marker (2:28)
-
StartTracing the Design to Create Templates (5:04)
-
StartCutting Out The Nose Template (1:45)
-
StartChoosing the Best China for the Nose, Gluing the Template to It & Cutting it Out (5:56)
-
StartRefining the Nose Using the Electric Grinder (2:50)
-
StartUsing a Dremel to Shape and Create the Nostrils (6:20)
-
StartPainting the Nostrils and Nose Details (1:51)
-
StartHow To Choose the Pupil for The Eye (2:48)
-
StartShaping the Pupil with the Grinder (3:53)
-
StartChoosing the Best Color for The Iris of the Eye (4:45)
-
StartUsing the Right Bit for Grinding the Iris to Fit the Pupil (14:54)
-
StartAlex's Technique for Building The Dog Eye (5:06)
-
StartShaping The Pupil and Brown Iris (8:56)
-
StartPt 1: How to Create the White of the Eye (2:15)
-
StartPt 2: How to Create the White of the Eye (5:26)
-
StartPt 3: How to Create the White of the Eye (6:38)
-
StartPt 4: How to Create the White of the Eye (14:42)
-
StartPreparing to Work on the Dog’s Face and Ears (0:55)
-
PreviewSolange and Alex Share Their Tips for Creating the Ears (7:08)
-
StartRefining the Pieces of the Ear with the Grinder (11:04)
-
StartCreating the Pieces Around the Eye (9:14)
-
StartHow to Make the Final Adjustments with the Grinder (4:51)
-
StartStaging the Pieces Around the Eye, Ear, and Nose (1:03)
-
StartChoosing Pieces for the Mosaic: Shape and Pattern Direction (4:09)
-
StartWhy You Choose Certain Pieces of China for Different Areas of the Face (3:22)
-
StartShaping and Refining Pieces Above the Nose (8:15)
-
StartRefining the Pieces So They Nestle Together (5:10)
-
StartChoosing the Best Plate for the Side of the Face (10:08)
-
StartReviewing The Shaped Pieces Around the Face (5:30)
-
StartUsing Curved Plate Pieces to Create the Contours of the Face (6:53)
-
StartTransfer the Cut Pieces to The Cartoon Image (8:32)
-
StartUnderstanding the Differences Between Muscular and Fluffy Dogs (9:00)
-
StartPreparing and Tinting the Thinset~Begin Adhering the Mosaic (22:17)
-
StartAdhering the Pieces in an Intentional Order (26:10)
-
StartMove To Other Areas of the Face to Work to Take Care Not to Bump or Shift Pieces as You Work (7:48)
-
StartAlex’s Tips for Removing Dried Thinset and Creating a Tighter Fit (11:43)
-
StartRefining and Grinding the Tessera for a Better Expression and Fit (11:13)
-
StartRefining and Adhering the Pieces to Build the Body (25:53)
-
StartPart 1: Refining the Details as You Adhere the Eye and Surrounding Pieces (14:55)
-
StartPart 2: Refining the Details as You Adhere the Eye and Surrounding Pieces (11:46)
-
StartFinishing with the Smaller, More Detailed Pieces (23:10)
-
StartCreating the Small Mouth and Refining the Surrounding Area (3:32)
-
StartSolange’s Tips for Creating the Background (10:45)
-
StartLearn How to Use a Piping Bag to Apply Tinted Mortar in Narrow Spaces (3:30)
-
StartThank you and Wrap Up (0:23)
-
StartBONUS: An Alternative Option for the Eye (8:13)
-
StartPDF para Download: Ferramentas, Materiais e Recursos Sugeridos
-
StartComo Escolher a Melhor Foto para o Mosaico do Seu Cachorro (0:46)
-
StartEscolhendo o Melhor Substrato e Posicionando a Imagem Sobre Ele (1:51)
-
StartSelecionando Pratos, Canecas e Tigelas para a Paleta do Seu Mosaico (5:25)
-
StartSolange.Dog_52 (4:02)
-
StartMapeando as Características Faciais do Cachorro para o Design e o Equilíbrio (22:43)
-
StartPlanejando o Design: Estrutura e Equilíbrio para Peças Grandes (5:34)
-
StartEntendendo Dimensão e Relevo Usando uma Moeda (3:25)
-
StartTransferindo o Desenho para o Substrato (7:36)
-
StartTraçando o Desenho para Criar Moldes (1:45)
-
StartContornando o Desenho com um Marcador Prateado (2:28)
-
StartRecortando o Molde do Focinho (5:04)
-
StartEscolhendo a Melhor Peça de Porcelana para o Nariz, Colando o Molde e Recortando a Peça (5:56)
-
StartRefinando o Nariz com a Retífica Elétrica (2:50)
-
StartUsando uma Dremel para Modelar e Criar as Narinas (6:20)
-
StartPintando as Narinas e os Detalhes do Nariz (1:51)
-
StartComo Escolher a Pupila para o Olho (2:48)
-
StartModelando a Pupila com a Retífica (3:53)
-
StartEscolhendo a Melhor Cor para a Íris do Olho (4:45)
-
StartUsando a Ponta Certa para Desbastar a Íris e Encaixá-la na Pupila (14:54)
-
StartA Técnica de Alex para Construir o Olho do Cachorro (5:06)
-
StartModelando a Pupila e a Íris Marrom (8:56)
-
StartParte 1: Como Criar a Parte Branca do Olho (2:15)
-
StartParte 2: Como Criar a Parte Branca do Olho (5:26)
-
StartParte 3: Como Criar a Parte Branca do Olho (6:38)
-
StartParte 4: Como Criar a Parte Branca do Olho (14:42)
-
StartPreparando-se para Trabalhar no Rosto e nas Orelhas do Cachorro (0:55)
-
StartSolange e Alex Compartilham Suas Dicas para Criar as Orelhas (7:08)
-
StartRefinando as Peças da Orelha com a Retífica (11:04)
-
StartCriando as Peças ao Redor do Olho (9:14)
-
StartComo Fazer os Ajustes Finais com a Retífica (4:51)
-
StartPosicionando as Peças ao Redor do Olho, da Orelha e do Nariz (1:03)
-
StartEscolhendo Peças para o Mosaico: Forma e Direção dos Padrões (4:09)
-
StartPor Que Escolher Certas Peças de Porcelana para Diferentes Áreas do Rosto (3:22)
-
StartModelando e Refinando as Peças Acima do Nariz (8:15)
-
StartRefinando as Peças para que se Encaixem Perfeitamente (5:10)
-
StartEscolhendo o Melhor Prato para a Lateral do Rosto (10:08)
-
StartRevisando as Peças Modeladas ao Redor do Rosto (5:30)
-
StartUsando Peças Curvas de Pratos para Criar os Contornos do Rosto (6:53)
-
StartTransferindo as Peças Cortadas para o Desenho (8:32)
-
StartEntendendo as Diferenças entre Cães Musculosos e Peludos (9:00)
-
StartPreparando e Tingindo a Argamassa Colante~Começando a Fixar o Mosaico (22:17)
-
StartFixando as Peças em uma Ordem Intencional (26:10)
-
StartPasse para Outras Áreas do Rosto, Tomando Cuidado para Não Esbarrar ou Deslocar as Peças Enquanto Trabalha (7:48)
-
StartDicas de Alex para Remover a Argamassa Colante Seca e Conseguir um Encaixe Mais Preciso (11:43)
-
StartRefinando e Desbastando a Tessela para Melhorar a Expressão e o Encaixe (11:13)
-
StartRefinando e Fixando as Peças para Construir o Corpo (25:53)
-
StartParte 1: Refinando os Detalhes ao Fixar o Olho e as Peças ao Redor (14:55)
-
StartParte 2: Refinando os Detalhes ao Fixar o Olho e as Peças ao Redor (11:46)
-
StartFinalizando com as Peças Menores e Mais Detalhadas (23:10)
-
StartCriando a Boca Pequena e Refinando a Área ao Redor (3:32)
-
StartDicas de Solange para Criar o Fundo (10:45)
-
StartAprenda a Usar um Saco de Confeitar para Aplicar Argamassa Tingida em Espaços Estreitos (3:30)
-
StartAgradecimentos e Encerramento (0:23)
-
StartBÔNUS: Uma Opção Alternativa para o Olho (8:13)