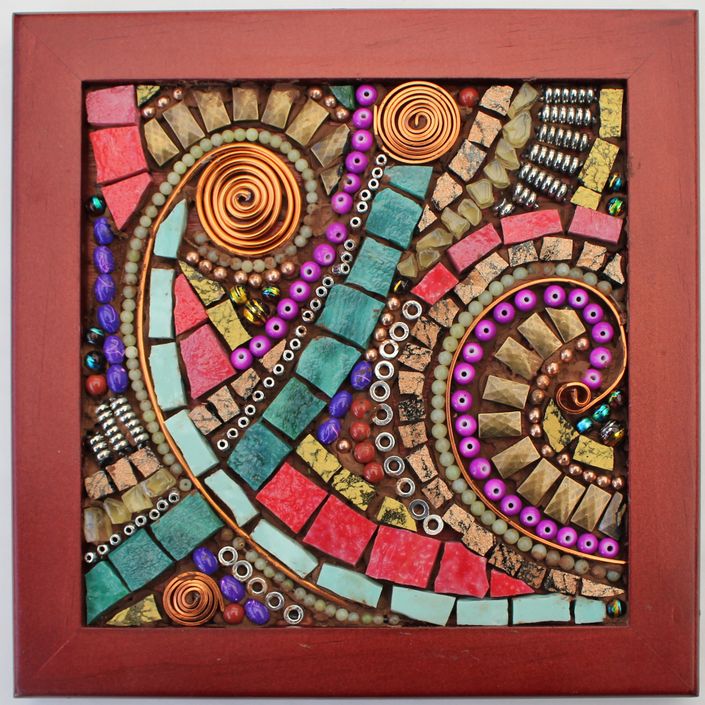
Organic Abstract Mosaic with David Jarvinen
Learn this fun and creative approach to organic abstract mosaics.
Watch Promo Enroll in Course
Dive in and let your senses take over in this Mosaic Arts Online course as David Jarvinen shares his techniques and experience for creating organic abstract mosaics. Using this technique, he teaches how to create a mosaic that looks like a cropped section of a larger mosaic piece. This online course is designed to use the senses to create and understand the relationships between the materials.
In this course you will learn:
- How to create balance in a composition
- How to choose your materials
- How to edit out certain or "too many" materials
- How to create the tinted adhesive
- How to plan your piece while still allowing for organic creative flow
- How to fill in the negative space
- How to successfully cut certain materials
- How to add wire, beads, Mexican smalti and other materials
- How to clean and seal the mosaic
Students will learn about composition, balance, and other important art elements through David's placement and use of the tesserae. David uses a wide variety of materials from all types of resources. He shares many of these resources in order to make it easy to shop for them to begin your project. He also explains that you can use just about any material, and many may be right in your home or studio. This technique is very achievable for the beginner or the more experienced mosaic artist. In addition, there are many close-up views of David teaching how he cuts different tesserae using wheeled nippers and other tools.
This online course is broken up into sections. David suggests watching the course all the way through to understand the process. This way, students will have a better understanding of the project from beginning to end.
There is a downloadable PDF with a full list of all the tools, materials, and resources to get started on this inspiring and creative online course! Check out the FREE promo video and interview with David above this text.
Your Instructor

I came to the mosaic industry through ceramic tile contracting and a couple of clay artists. Our business was remodeling kitchens and baths with ceramic and glass tile, and doing tile jobs most other contractors wouldn’t. This led to a reputation for being creative.
During this time, I met those couple of clay artists that asked me to assist with their school and public mural installations they had created. It was great fun and I volunteered to help. Then, after a year or two of volunteering, I landed a paying gig to cover for one of the artist installers, as they needed to go out of town. That was the beginning. Circa 1998.
From this beginning, I worked to incorporate mosaics into my contracting business and there was a market! It wasn’t huge, but it was there—I worked to make mosaics mainstream through our business and have had some happy customers as a result.
Most of my work was architectural in nature. Then the clay artist who had instructed classes, for which I assisted—was moving out of state, so I approached the host venues and inquired to see if I could take over for her. They were happy to give me a try. That was the beginning of my instruction career. Circa 2004.
I continued to expand my collaborations and as of 2017 I am continuing to instruct, learn and create mosaics!
Course Curriculum
-
StartIntro to Organic Abstract Mosaic (5:54)
-
StartPDF for Download. Suggested tools, materials, and resources.
-
StartVisual introduction to tools and materials. (0:58)
-
StartVisual of frame and materials to create the abstract mosaic. (2:50)
-
StartHow to prepare the adhesive. (3:26)
-
StartHow to work with the wire to create the flow. (3:08)
-
StartHow to cut the Mexican smalti and adhere the wire. (9:19)
-
StartAdhering wire and Mexican smalti part 2. (3:11)
-
StartIntroduce how to adhere beads that are on string and loose. (7:55)
-
StartAdding smaller tesserae for balance with Mexican smalti and glass pieces. (8:45)
-
StartIntroduction of new Mexican smalti color and great tips on cutting with nippers. (7:02)
-
StartLearn to work with loose metal and glass beads. (7:22)
-
StartAdding complementary tesserae while learning about composition and balance. (7:12)
-
StartAdding final tesserae and filling in negative spaces. (5:53)
-
StartFinal section: Learn how to preserve adhesive, clean and seal the mosaic. (7:08)
Frequently Asked Questions
TESTIMONIALS:
Whee! Supplies and smalti ordered, off to the bead store! Thanks David. You've inspired the backsplash for my new kitchen. Catherine V.