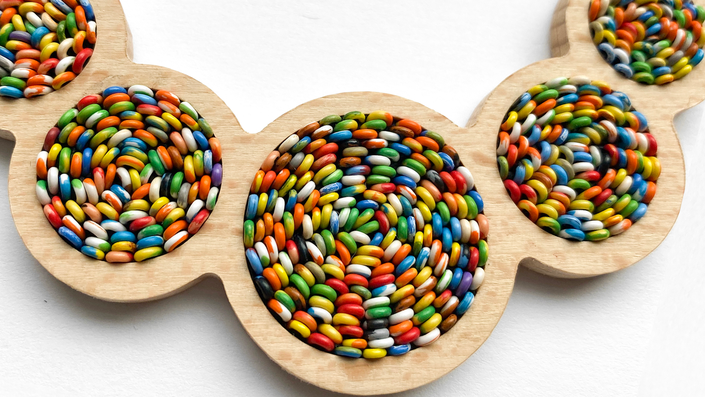
Are you looking for a new approach to creating mosaic art? One that uses thin telephone wire as an alternative to traditional micro mosaic materials? If you answered “yes” to these questions then we have just the course for you.
Donna Van Hooser has brought her one-of-a-kind course to Mosaic Arts Online and now you can learn her tried and true methods using everyday telephone wire to create colorful and detailed mosaics.
Donna created this technique while exploring how wire could be incorporated into her traditional filati mosaics. After many months of experimentation, you can now learn Donna’s perfected style of creating mosaics with wire.
In this course you will learn:
- How to acquire the cables of telephone wire
- How to remove it from the cables
- Donna’s method for cutting and bending the wire
- How to separate the colors into values
- How to use the Apoxie Sculpt on a variety of substrates
- How create simple designs that have flow and movement
- How to create jewelry and small items
- How to incorporate other materials with the wire mosaic
- How to create a sample figurative piece with values and shading
This technique can be very meditative and gratifying. The limited palette and simple method of cutting and bending the wire is very achievable for any level of artist. With a few tools and materials you will be creating your own telephone wire mosaics in no time.
Your Instructor

I began making mosaics while working as an artist for Hallmark Cards. With my background in illustration, I try to incorporate storytelling in my work using classical and whimsical elements. I learn and grow through experimentation and often find inspiration from the materials themselves.
While I have been making mosaics since about 1991, it wasn’t until I retired from Hallmark in 2015 that I have been able to work as a full time mosaic artist and instructor.
I love working in mosaic, especially dealing with the challenges and limitations of the materials. The glass must be carefully chosen from a limited palette, since colors cannot be mixed, and each piece must serve as an individual brush stroke working in harmony with the surrounding pieces.
Course Curriculum
-
StartIntro and Personal Interview with Donna and Tami (5:59)
-
StartPDF for download. Tools, materials, and resources
-
StartOverview of materials and tools (0:43)
-
StartHow to cut the cable and remove the wire (7:09)
-
StartDemo on how to cut and bend the wire (8:36)
-
StartHow a novice cuts and bends the wire (4:19)
-
StartAlternative wire to use with the telephone or instead of... (3:08)
-
StartProject 1: Creating a pendant with Apoxie Sculpt (4:38)
-
StartCreating the pendant (8:11)
-
StartCompleting the pendant (3:08)
-
StartTechnique for using an open back pendant (1:27)
-
StartProject 2: A trinket box, how to add a simple design (3:31)
-
StartChoosing a color palette to follow the design (4:09)
-
StartFollowing the design of the added inclusion (3:09)
-
StartMore tips and tricks for adding the wire (9:19)
-
StartHow to work clean with Apoxie Sculpt (1:48)
-
StartHow to create a fanning effect with the wire (5:25)
-
StartUsing the wire to keep the lines and flow consistent (7:19)
-
StartContinue to watch Donna work and make decisions (7:35)
-
StartCompleted trinket box (0:36)
-
StartProject 3: Color freedom eye with telephone wire (1:26)
-
StartHow to transfer the design to the substrate (3:13)
-
StartHow to remove the paint from the wire (2:01)
-
StartHow to create the pupil (9:26)
-
StartAdding highlights to the eye (9:07)
-
StartMore details creating the eye (12:24)
-
StartCreating the white of the eye (14:46)
-
StartThe shading of the eyelid (10:55)
-
StartHow to create fur direction with the wire placement (13:01)
-
StartDirections for moving forward on the eye (1:03)
-
StartWrap up and thank you (0:24)
-
StartBONUS: Violet the dog, a life size portrait. More tips and techniques using the wire with other materials (2:14)